How to Install AccuLock S Liners Using Power Pin Cap With Set Screw
Step 1
A. Remove the nozzle
B. Loosen the gas diffuser
C. Remove the gas diffuser
D. Loosen the set screw in the power pin cap and remove the cap from the rear of the gun.
(Example of how to loosen the set screw in the power pin cap)
Step 2
A. Remove the old liner
B. Replace the new liner through the neck
C. With the gun laying straight, push the liner through until the brass liner lock bottoms on the neck
(Example of how the brass liner lock bottoms on the neck)
Step 3
A. To lock and center the liner, reinstall and tighten the gas diffuser
(Example of tightening the gas diffuser)
B. Reinstall the nozzle
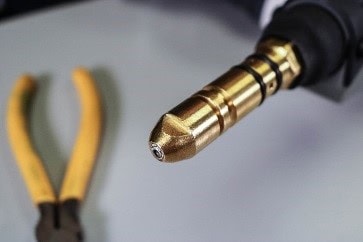
C. Place the power pin cap over the liner and thread onto power pin
D. Tighten the cap snug against the power pin shoulder with welding pliers or appropriate wrench
E. Holding the hex wrench as shown, tighten the set screw “finger tight” against the liner
F. Next, hold the hex wrench by the handle and tighten the set screw an additional one-half turn to fully secure the liner
Step 4
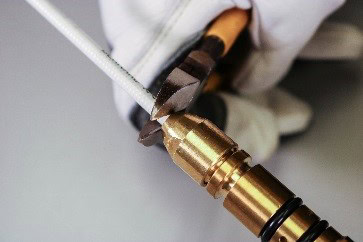
A. Trim the liner flush with the power pin
(After step 4A, it should look like this)
B. Insert a piece of welding wire into the liner to check for burrs or obstructions. If needed, loosen screw slightly until wire slides freely
How to Install AccuLock S Liners Without Set Screw (Purchased before March 17, 2022)
Step 1
A. Remove nozzle
B. Loosen gas diffuser
C. Remove gas diffuser.
D. Remove power pin cap from the rear of the gun
Step 2
A. Remove old liner
B. Replace new liner through the neck
C. With the gun laying straight, push liner through until the brass liner lock bottoms on the neck
Step 3
A. To lock and center the liner, reinstall gas diffuser
B. Reinstall nozzle
C. Identify power pin to determine appropriate power pin cap torque specification. Power pin shown left: If your power pin has a large ID, please contact Customer Support to obtain the proper AccuLock S Power Pin Power pin shown right: Torque to 10 ft-lbs / 120 in-lbs (13.5 Nm)
D. Place power pin cap over the liner
E. Place torque wrench on power pin cap and torque to value identified in 3C